
The Novastar UHD Jr is an all-in-one 4K LED video controller and sending processor built for large rental, stage, conference, exhibition, and fine-pitch LED displays. It combines video processing, screen configuration, 16 Neutrik Ethernet outputs, 4 optical outputs, and a maximum loading capacity of 10,400,000 pixels in one 4U unit. This practical Novastar UHD Jr guide explains specifications, connection planning, quick configuration, free topology, layers, HDR, low latency, working modes, troubleshooting, and the Novastar UHD Jr manual workflow.
Key takeaways
- Choose the Novastar UHD Jr when a project needs 4K-class inputs, large pixel capacity, flexible routing, and one-device control.
- Calculate cabinet pixels and port loading before wiring; 10.4 million pixels is the total device ceiling, not a target for every layout.
- Use Quick Configuration for regular cabinet grids and free topology for irregular or creative layouts.
- Low latency reduces the sending-card-to-receiving-card path by 2 frames when compatible NovaStar Armor receiving cards are used.
- Save a tested preset and a backup configuration before changing firmware, EDID, topology, HDR, or working mode.
1. Novastar UHD Jr Overview, Specifications, and Best Use Cases
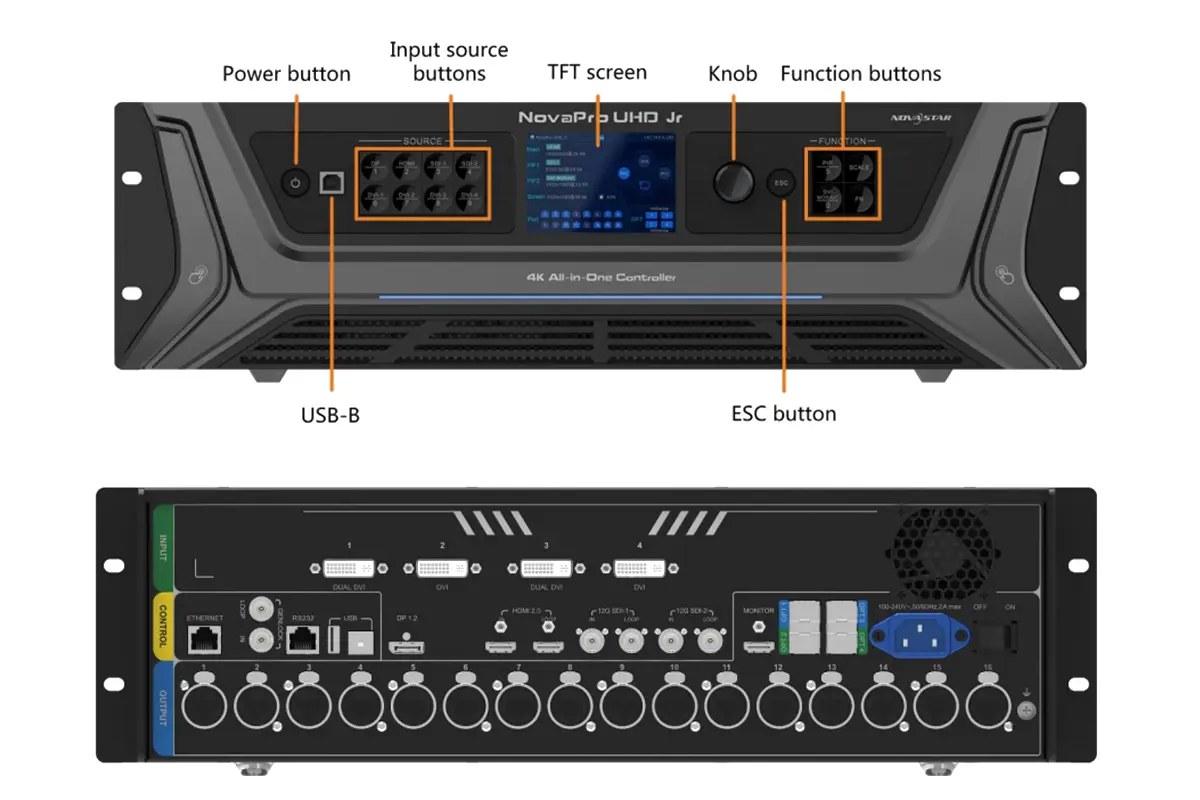
The Novastar UHD Jr, also written as NovaPro UHD Jr, is designed for installations that need both processing and LED sending in the same chassis. NovaStar describes the product as an all-in-one controller with video processing, sending-card functions, and LED screen configuration. That combination reduces the number of separate devices in a control rack and gives an operator one place to manage input selection, scaling, canvas position, layers, and screen output.
The clearest reason to select the Novastar UHD Jr is capacity. The official NovaStar product page specifies 10,400,000 pixels, a maximum canvas width of 16K, and a maximum height of 8K. Those are boundary values: the usable layout still depends on refresh rate, bit depth, receiving-card configuration, redundancy, and the pixel load assigned to each Ethernet output.
| Category | Official capability | Planning implication |
|---|---|---|
| Total loading | Up to 10,400,000 pixels | Calculate the complete canvas and reserve capacity for redundancy or future cabinet changes. |
| Canvas limits | Maximum width 16K; maximum height 8K | Useful for very wide ribbon screens or tall creative displays, subject to total pixel capacity. |
| Video inputs | 1 × DP 1.2, 4 × DVI, 1 × HDMI 2.0 with loop, 2 × 12G-SDI with loop | Supports computers, media servers, legacy DVI sources, and broadcast SDI workflows. |
| LED outputs | 16 × Neutrik Ethernet; 4 × optical fiber | Plan port maps, cable paths, and backup routes before building the receiving-card file. |
| Layers | 3 layers + 1 BKG | Run a main canvas with overlays plus a background without an external switcher for many jobs. |
| Presets | Up to 10 user presets | Store validated looks for rehearsal, show, intermission, backup, and venue handover. |
| Frame rates | Includes 23.98, 29.97, and 59.94 fps | Match broadcast and cinematic sources without an avoidable frame-rate conversion. |
01. When the Novastar UHD Jr Is a Strong Fit
Use the Novastar UHD Jr for concert touring, corporate events, broadcast studios, exhibition stands, command rooms, and fine-pitch LED walls where several input standards or a large canvas must be handled reliably. Its 12G-SDI connections suit broadcast equipment, while DP 1.2 and HDMI 2.0 suit computers and media servers. For a smaller screen with fewer inputs, a more compact NovaStar all-in-one controller may be simpler and more economical.
02. What the Published Limits Do Not Guarantee
A maximum specification is not a guaranteed show configuration. The controller cannot correct weak source timing, a wrong receiving-card file, damaged Ethernet, mismatched firmware, or cabinet power faults. Validate the complete system at the intended resolution, frame rate, bit depth, refresh rate, and backup state.
NovaStar states that the controller sends processed video through “Neutrik Ethernet ports and optical fiber ports.” Copper is convenient near the screen; optical paths suit long runs and electrical isolation.
Source: Xi’an NovaStar Tech Co., Ltd.
2. How to Connect the Novastar UHD Jr Correctly
Connect the controller in this order: source, loop monitor if required, controller outputs, LED receiving cards, control computer, and power. Before power-on, label every cable and record its input, output port, cabinet chain, and backup route so the physical path can be compared with the port map.
01. Choose the Right Input
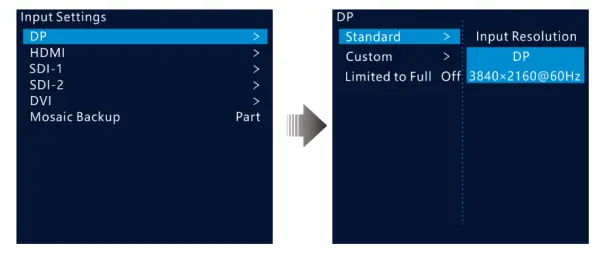
Match the connector to the source and environment. DP 1.2 suits a high-resolution workstation or media server. HDMI 2.0 is common for presentation and playback. 12G-SDI provides a locking broadcast path with loop output. DVI supports legacy sources and a four-input mosaic on the unit.
| Input | Available connections | Best use | Check before show |
|---|---|---|---|
| DP 1.2 | 1 input | Media servers and high-resolution computers | GPU output timing, color format, adapter quality, and EDID. |
| HDMI 2.0 | 1 input + loop | Presentation laptops, playback, and local confidence monitoring | HDCP behavior, cable length, connector strain, and loop-monitor compatibility. |
| 12G-SDI | 2 inputs + loop outputs | Broadcast cameras, production switchers, and long coax workflows | Signal level, cable rating, frame rate, and SDI standard at both ends. |
| DVI | 4 inputs | Legacy processors and multi-source DVI mosaic | Single/dual-link mode, adapter direction, EDID, and mosaic order. |
The HDMI Licensing Administrator documents the HDMI 2.0 family, while NovaStar defines supported timings for this controller. Use the official specifications and user manual as the final reference; a connector label does not prove every source format is accepted.
02. Build the Output Map
Assign each of the 16 Ethernet outputs to a defined cabinet chain. Use short, certified patch leads in the rack and strain-relieve field cables. The locking Neutrik format is intended for rugged professional use; the Neutrik etherCON overview explains the ruggedized RJ45 concept. Optical outputs are valuable when the control position is far from the LED wall, the cable route crosses electrically noisy areas, or galvanic isolation is desirable.
03. Complete a Power-On Preflight
| Checkpoint | Pass condition | If it fails |
|---|---|---|
| Source timing | The controller recognizes the intended resolution and frame rate. | Load a standard EDID, test a known-good cable, then set the source output manually. |
| Port map | Every cabinet chain matches the configuration file and physical labels. | Stop and reconcile wiring before changing software coordinates. |
| Receiving-card file | Correct image, scan mode, color order, module dimensions, and refresh behavior. | Reload the cabinet file supplied for the exact LED module and receiving card. |
| Redundancy | Primary and backup paths are separate, tested, and documented. | Do not assume a backup is working because it is connected; force a failover test. |
| Preset backup | A known-good preset and configuration copy exist before edits. | Export or record settings before firmware, EDID, topology, or mode changes. |
3. Quick Configuration for a Regular LED Screen
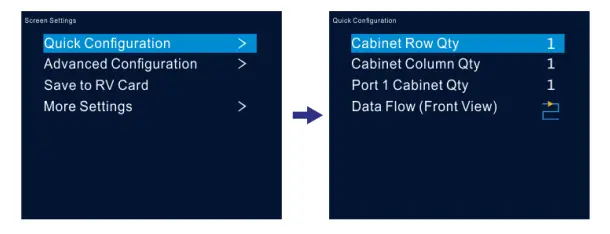
Quick Configuration is fastest when identical cabinets form a regular rectangle. Define the rows, columns, cabinets loaded by the first Ethernet port, and physical data-flow direction. The controller maps the repeated pattern without requiring every cabinet coordinate.
01. Prepare the Cabinet File and Pixel Math
Confirm one cabinet’s pixel width and height, then calculate the full canvas and every chain. A 192 × 192-pixel cabinet contains 36,864 pixels; 12 cabinets contain 442,368 pixels. Repeat this calculation for every output and keep loads within the active mode and receiving-card limits.
02. Configure the Screen in Sequence
- Power on the controller and LED wall, then confirm that all receiving cards report normally.
- Open Screen Settings > Quick Configuration from the front-panel menu.
- Enter the total cabinet rows and columns, then set how many cabinets are carried by Ethernet Port 1.
- Select the wiring direction that matches the physical chain: horizontal, vertical, or serpentine.
- Check the test image from corner to corner. A repeated or shifted image normally indicates a wrong cabinet count, data-flow direction, or cabinet file.
- Save the Novastar UHD Jr configuration only after the full screen is correct, then store it as a named preset.
03. Verify More Than a Single Test Pattern
Test red, green, blue, white, gray scale, fine lines, motion, and real content. Look for swapped channels, scan artifacts, tearing, seams, crop, and uneven brightness. A correct controller map can still hide a wrong cabinet file or source setting.
4. Free Topology on the Novastar UHD Jr for Irregular Layouts
Free topology lets an operator position output loads according to the physical installation rather than forcing every Ethernet load into a simple rectangle. It is useful for stepped walls, ribbons, creative shapes, separated clusters, columns, and layouts containing deliberate gaps. The goal is not to create a visual effect; it is to make the logical Novastar UHD Jr canvas match the real cabinet positions.
01. Plan Coordinates Before Opening the Menu
Draw the complete canvas and record the top-left X/Y coordinate of each cabinet group. Use one coordinate system and keep the source canvas origin at 0,0. Note cabinet pixel dimensions, Ethernet port number, receiving-card order, and the first cabinet in each chain. This worksheet becomes the commissioning record and makes later troubleshooting far faster.
02. Apply the Free-Topology Map
- Open advanced screen configuration and enable the topology function available in the installed firmware.
- Select one Ethernet port and enter the cabinet group dimensions and position.
- Place that group at its calculated horizontal and vertical offset.
- Repeat for every output, preserving intentional gaps and avoiding accidental overlap.
- Run a numbered grid test image that shows coordinates and cabinet boundaries.
- Save a dedicated preset, export the configuration, and record the firmware version used.
03. Avoid Three Common Mapping Errors
Do not confuse cabinet order with canvas position: a cable chain may snake while visual coordinates remain left-to-right. Allocate blank pixels only for a genuine gap, and never change a tested topology before a show without a rollback preset. If menu labels differ, follow the manual for the installed release.
5. Novastar UHD Jr Layers, Scaling, Presets, and EDID
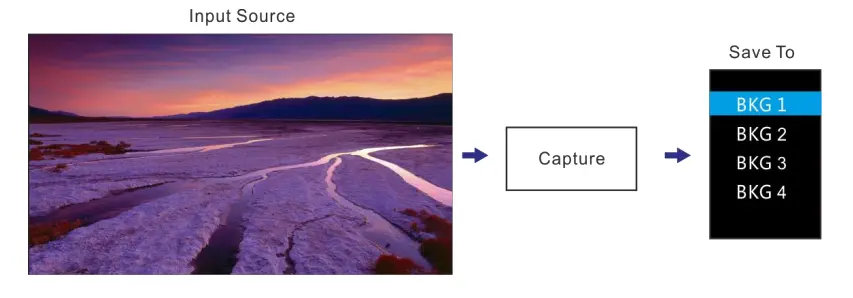
The Novastar UHD Jr supports 3 layers plus 1 background, personalized scaling, image capture, EDID management, and 10 user presets. These tools can replace a separate processor for straightforward productions, but they still require disciplined operation. Name the source, define its native timing, set layer priority, and save only configurations that have been tested on the real LED wall.
01. Understand the Layer Stack
| Function | Purpose | Typical use | Operational caution |
|---|---|---|---|
| Main layer | Primary full-canvas program source | Media server, presentation, or program feed | Confirm scaling and crop before adding overlays. |
| Additional layers | Two overlay sources within the 3-layer total | Camera window, sponsor graphic, confidence content | Check priority, size, aspect ratio, and whether all active formats are supported. |
| BKG | Color or captured-image background | Hold frame, brand color, or safe fallback | A captured image can become stale; label the preset and confirm the source date. |
| Scaling | Full screen, pixel-to-pixel, or custom | Fit sources to the LED canvas | Pixel-to-pixel preserves detail but may not fill the output canvas. |
| EDID | Advertises accepted timing to a source | Force a computer to output the required format | An invalid custom EDID can remove the picture; keep a standard fallback. |
| Preset | Saves a reusable operating state | Rehearsal, show, backup, intermission | Recall every preset during testing; names alone do not prove validity. |
02. Set Scaling and Crop Deliberately
Use full-screen scaling to fill the canvas, pixel-to-pixel for critical detail, and custom scaling for a defined region. When aspect ratios differ, decide whether to letterbox, crop, or stretch; do not leave that creative decision to the processor.
03. Use V-Can for Repeatable Control
NovaStar’s V-Can Video Control Software User Manual is the primary software reference. Connect to the correct device, pull the active configuration before changes, and keep a dated backup. Never assume a laptop file is newer than the configuration on the unit.
6. Novastar UHD Jr HDR, Low Latency, and 3D Planning
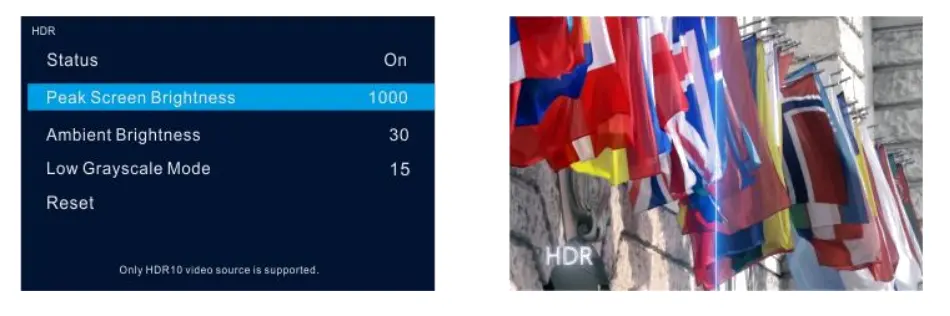
Performance features should be enabled only when the complete signal chain supports them. The Novastar UHD Jr can provide HDR output, decimal frame rates, and reduced receiving-path latency. A successful setup still depends on the source, cable, controller firmware, receiving card, cabinet file, LED module, and calibration. Change one feature at a time and compare it with a known-good preset.
01. HDR Output
HDR can increase visible highlight and shadow detail when the content and LED system are prepared for it. Pair the Novastar UHD Jr with a compatible NovaStar receiving-card and calibration workflow, then verify color space, transfer function, bit depth, brightness mapping, and content mastering. Enabling an HDR label without matching the display pipeline can produce clipped highlights, crushed shadows, or incorrect color.
02. Low-Latency Output
NovaStar states that low-latency output reduces latency from the sending card to the receiving card by 2 frames when the Novastar UHD Jr is paired with A8, A8s, A9s, or A10s Plus Armor-series receiving cards. This is a reduction, not a promise that the total camera-to-screen delay equals 2 frames. Cameras, switchers, scalers, source frame buffers, receiving cards, and LED scan architecture all contribute to end-to-end latency.
03. 3D Workflow
A 3D installation requires a compatible 3D source, synchronization hardware, glasses, receiving configuration, and sufficient refresh performance. Confirm side-by-side, top-and-bottom, or frame-sequential formatting at every device. For frame-sequential content, confirm the required source timing and test eye priority and synchronization before audience entry. Save a normal 2D Novastar UHD Jr preset as the immediate fallback.
The official feature list says low-latency output “reduces the latency from sending card to receiving card by 2 frames” with the named Armor receiving cards. Preserving the word reduces avoids the common but incorrect claim that total system delay is always two frames.
7. Video Controller Mode vs. Fiber Converter Mode
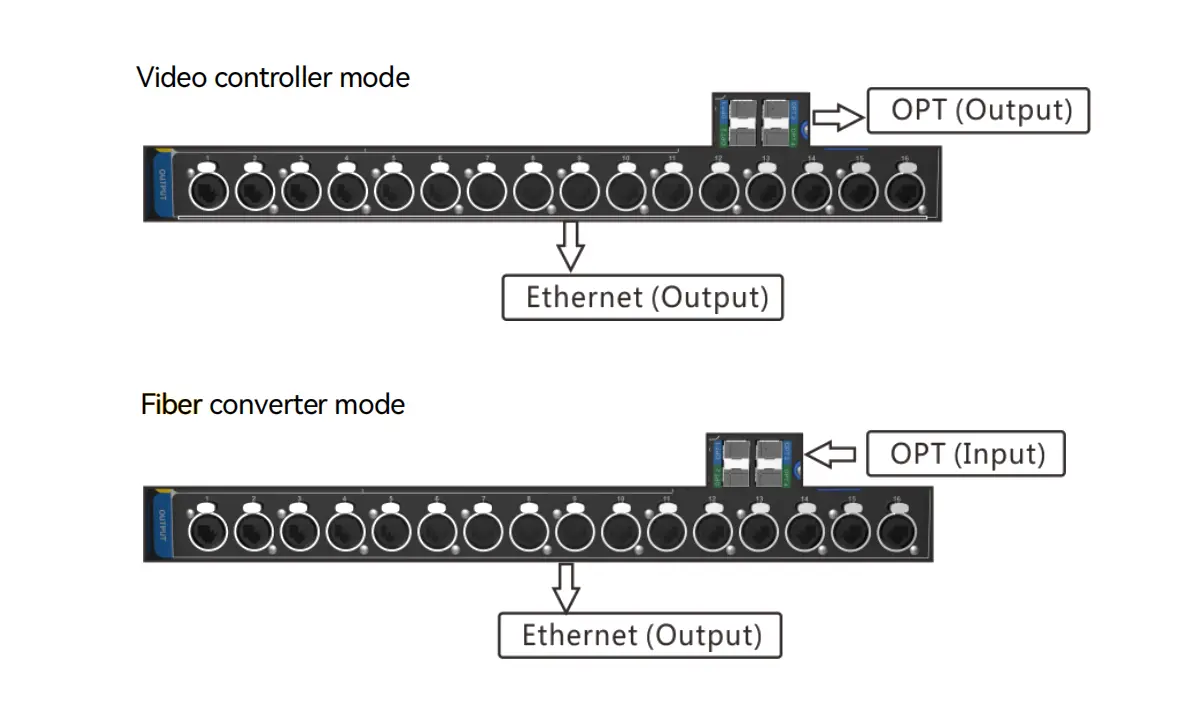
The Novastar UHD Jr provides two working approaches for different signal architectures. In video controller mode it processes local video inputs and sends the result to the LED system. In fiber converter mode the optical path participates in a remote transport architecture and Ethernet connects onward to the cabinets. Confirm the exact optical module, remote device, firmware, and port direction before connecting a production system.
01. Compare the Modes
| Decision | Video controller mode | Fiber converter mode |
|---|---|---|
| Main role | Processes a local DP, HDMI, DVI, or SDI source and sends LED data. | Extends an appropriate optical LED signal to Ethernet near the display. |
| Best location | Control rack near the source equipment. | Near the LED screen at the far end of a fiber route. |
| Primary advantage | All-in-one processing, layers, scaling, presets, and sending. | Long-distance transport and separation between control room and display. |
| Key check | Input timing, canvas, output map, and layer state. | Optical compatibility, port direction, remote-device configuration, and link status. |
| Change risk | An incorrect preset can alter the visible program. | A wrong working mode can interrupt the entire output path. |
02. Switch Modes Safely
Schedule a maintenance window, save the active Novastar UHD Jr configuration, document all cable destinations, and disconnect the live program path or move to backup. Select the intended working mode, allow the unit to restart, then verify port direction and link status before restoring content. A mode change is not a cosmetic setting; it changes the role of the controller in the signal chain.
03. Troubleshoot by Symptom
| Symptom | Likely checks | Recommended action |
|---|---|---|
| No input image | Source timing, EDID, HDCP, input selection, cable, loop monitor | Test a standard format and known-good cable; select the input manually and restore a standard EDID. |
| Only part of the LED wall works | Ethernet link, cabinet chain, port load, receiving-card power | Trace the first failed cabinet, swap a tested patch lead, and compare the physical chain with the port map. |
| Image repeats or shifts | Cabinet dimensions, row/column count, data-flow direction | Reload the correct cabinet file and repeat Quick Configuration with a numbered grid pattern. |
| Colors are wrong | RGB order, bit depth, color space, cabinet file, HDR state | Return to an SDR test preset, verify primary colors, then re-enable advanced processing one step at a time. |
| Intermittent flicker | Cable, connector strain, power, clocking, frame-rate conversion | Secure or replace the signal path, verify stable power, and match source and output frame rates. |
| Unexpected delay | Source buffer, switcher, scaling, receiving cards, scan mode | Measure end-to-end latency, enable compatible low-latency settings, and remove unnecessary conversions. |
8. Novastar UHD Jr FAQ
01. What is the maximum loading capacity of the Novastar UHD Jr?
The Novastar UHD Jr supports up to 10,400,000 pixels in total, with an official maximum width of 16K and maximum height of 8K. The practical design must also satisfy per-port loading, receiving-card, refresh-rate, bit-depth, redundancy, and firmware requirements. Use the official Novastar UHD Jr specifications for the final engineering check.
02. Where can I find the Novastar UHD Jr manual and firmware?
Use the Downloads section on the official NovaStar product page. Select the manual, quick-start guide, firmware, and release notes that match the installed hardware and software version. Back up the current configuration and read the release notes before upgrading the Novastar UHD Jr.
03. Can the Novastar UHD Jr accept 4K video?
Yes. NovaStar specifies 4K × 2K at 60 Hz image processing and sending capability, with DP 1.2, HDMI 2.0, and 12G-SDI among the available inputs. Confirm the exact resolution, frame rate, color format, and input limitations in the current manual rather than relying only on the connector type.
04. Does the Novastar UHD Jr support low latency?
Yes. With compatible A8, A8s, A9s, or A10s Plus Armor-series receiving cards, the low-latency function reduces the sending-card-to-receiving-card path by 2 frames. Total camera-to-screen latency will be higher because other devices and LED scanning also add delay.
05. When should I use free topology?
Use Novastar UHD Jr free topology for creative or irregular cabinet arrangements, separated display zones, ribbons, stepped walls, or layouts with intentional gaps. Use Quick Configuration for a regular rectangle of identical cabinets because it is faster and easier to audit.
06. How many presets can the Novastar UHD Jr store?
The controller supports up to 10 user presets. Create clear names for rehearsal, show, intermission, emergency backup, and service states. Recall and verify each preset on the complete system before treating it as production-ready.
07. Can I use third-party receiving cards?
Basic output compatibility depends on the exact receiving card and configuration, while advanced Novastar UHD Jr features may require specific NovaStar receiving cards. Confirm compatibility with the receiving-card manufacturer and the current NovaStar manual before purchase or deployment.
08. What should I save before changing settings?
Save the active Novastar UHD Jr configuration, cabinet receiving-card file, port map, EDID, presets, firmware version, source timing, and a photo of the working rack connections. Keep the backup offline and test that it can be restored before a live event.
Sources and verification: Technical limits on this page were checked against the NovaStar product page, Specifications V1.5.0, and the V-Can User Manual V3.8.0. Menus and feature availability can change with firmware. Verify the installed version before a production change.
Planning a complete LED system? Review our LED screen resolution guide, compare an indoor fine-pitch LED screen, or contact EagerLED with the screen dimensions, cabinet pixel resolution, source formats, control distance, and redundancy requirements.
 Top 10 German LED Display Suppliers in 2026
 Top 10 LED Display Manufacturers in China (2026 Guide)