Related Posts


This guide provides clear, step-by-step instructions for setting up, configuring, and controlling the Novastar H5 Video Wall Splicer. Get your video wall running quickly in control rooms, retail spaces, and event venues. No jargon, no fluff—just what works. Learn to configure multiple screens, manage advanced presets, and apply pro-level features with confidence.
catalogue
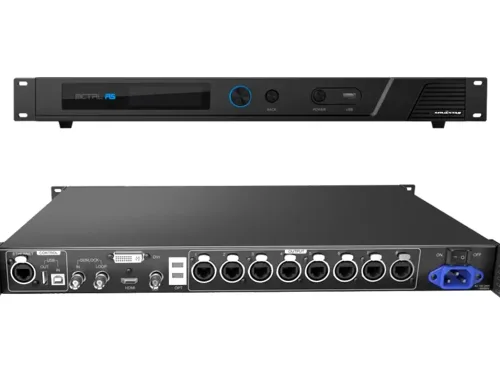
1.A Comprehensive Overview of Novastar H5 Video Wall Splicer
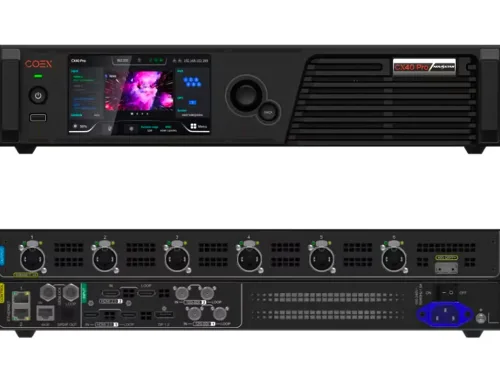
Novastar H5 is a next-generation video wall splicer that combines robust hardware architecture with a modular design. Its plug-and-play functionality allows users to hot-swap input and output cards effortlessly, ensuring minimal downtime during maintenance or upgrades. The H5 also supports centralized control of multiple screens, enabling operators to manage complex video walls with ease.


Key highlights of the Novastar H5 Video Wall Controller include:
- Modular and customizable card slots for flexible configurations.
- Support for diverse input sources, including HDMI, DVI, DP, SDI, IP cameras, and NDI.
- Advanced image processing capabilities, such as HDR10, HLG, and 10-bit color depth.
- Multi-layer display options with cross-connector output support.
- Web-based control interface for real-time collaboration across platforms.
Novastar H5 Video Wall Splicer Detailed Specifications Table
| Specification | Details |
|---|---|
| Resolution Support | Up to 8K (8192 × 4095 px) |
| Input Types | HDMI, DVI, SDI, VGA, IP (RJ45) |
| Output Types | RJ45, Fiber, HDMI, DVI |
| Max Layer Support | Up to 16 layers per card |
| Max Pixel Capacity | 39 million pixels (RJ45), 62.4 million (Fiber) |
| Control Method | Web control, NovaLCT |
| Power Supply | AC 100-240V |
| Dimensions | 482.6 × 532.8 × 228.2 mm (5U rackmount) |
| Weight | Approx. 25 kg |
| Operating Temp | 0°C to 45°C |
Novastar H5 Dimensions

2.How to Install & Set Up Your Novastar H5?
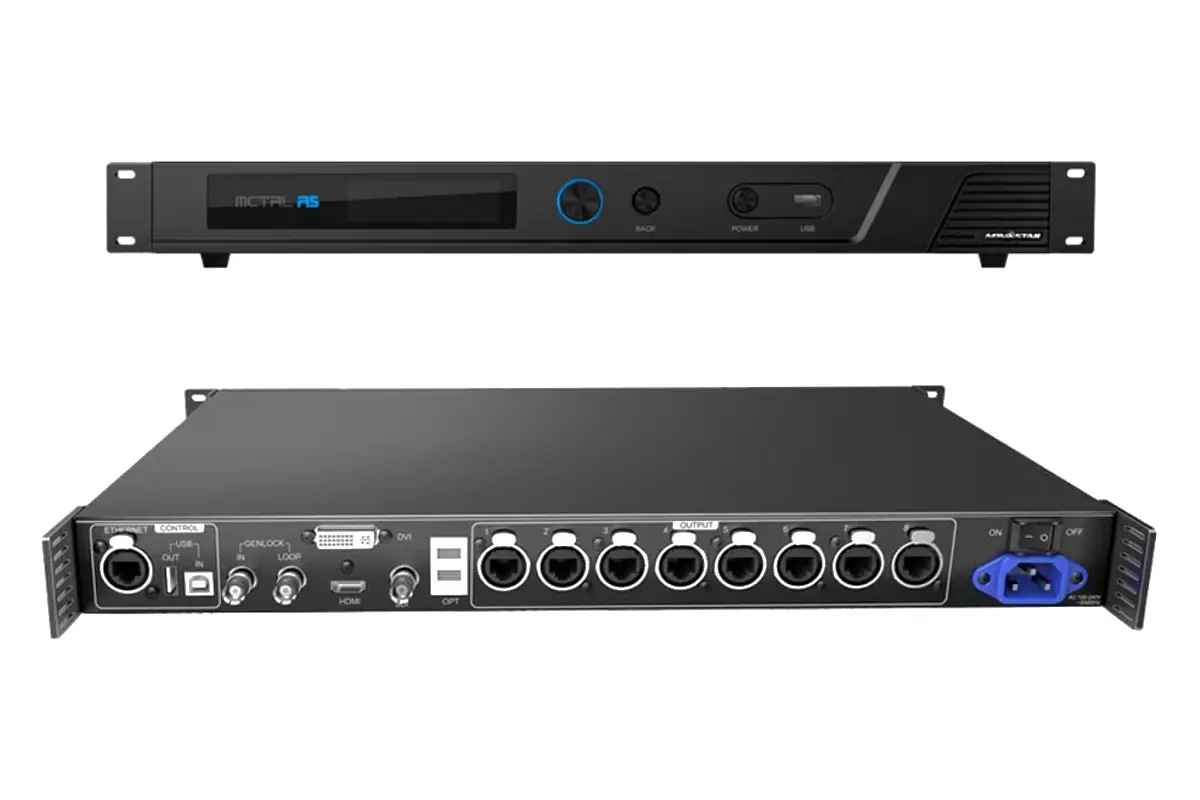
Physical Installation & Connections
Before powering on your Novastar H5 Video Wall Splicer, complete the following physical setup:
- Rack Mounting: Securely install the unit horizontally in a standard 19-inch rack. Use eight M5 screws to fix it in place. Ensure the rack can support at least four times the total equipment weight.
- Verify Card Installation: Confirm that your input and output cards are installed in the correct slots on the rear panel. Input slots are labeled “I-x” and output slots “O-x”.
- Make Connections: Connect all necessary cables before powering on.
| Component | Connection Details |
|---|---|
| Power Supply | Use the supplied power cord to connect to an electrical outlet (100–240V~, 50/60Hz). |
| Input Cards | Insert compatible input cards into designated slots labeled “I-x” (e.g., I-1 for Slot 1). |
| Output Cards | Insert compatible output cards into designated slots labeled “O-x” (e.g., O-10 for Slot 10). |
| Control Card | Use the Ethernet port for direct connection to a PC or router/switch for multi-user access. |
Initial Setup


Once installed, follow these steps to configure your H5:
- Power On: Flip the rocker switch to ON and wait for the home screen to appear.
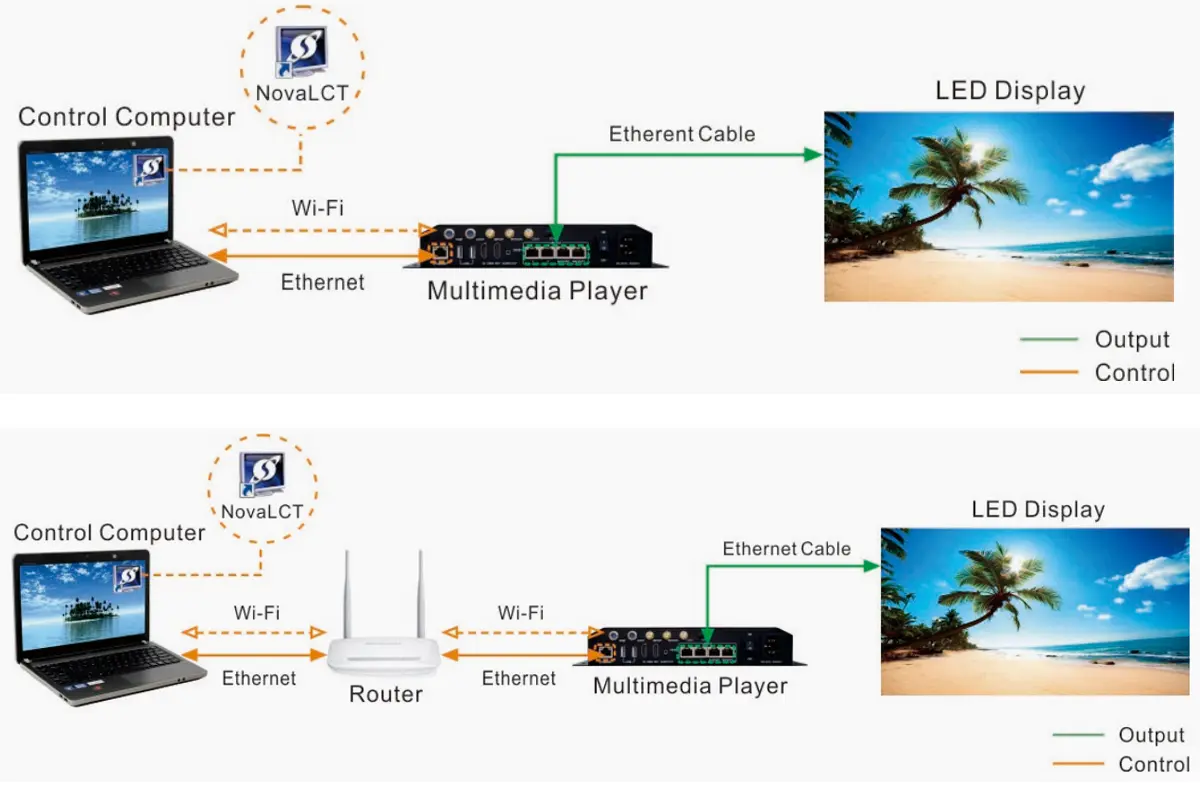
- Access Web Interface: Enter the default IP address (192.168.0.10) in a web browser to log in. Default credentials are admin for both username and password.
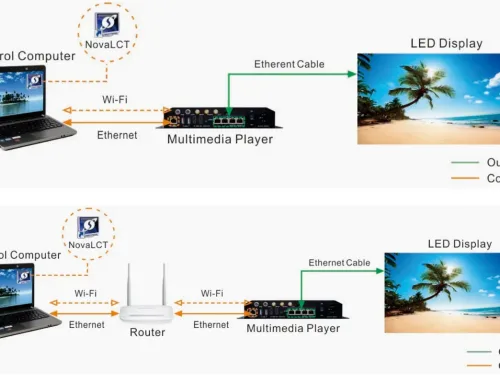
- Network Configuration: Go to Settings > Communication to adjust IP settings if needed. For DHCP-enabled networks, enable automatic IP assignment.
3.How to Configuring Your Video Wall with Novastar H5
Configuring your video wall involves defining the screen structure, associating outputs, and fine-tuning performance parameters. Here’s how to proceed:
Screen Configuration
- Navigate to the Configuration tab on the web interface.
- Click New Screen to define a new screen layout.
- Specify row and column quantities based on your physical setup.
- Drag and drop sending cards (e.g., H_16xRJ45+2xfiber or H_20xRJ45) onto the virtual screen grid.

Key Parameters to Configure
- Output Resolution: Set via Settings > EDID Management > Output.
- Frame Rate Synchronization: Ensure all outputs operate synchronously for smooth playback.
- LCD Bezel Compensation: Adjust horizontal and vertical spacing to compensate for bezels between panels.
Adding Layers
Layers allow you to overlay multiple content streams on your video wall:
- Select the target screen under the Programming tab.
- Drag an input source from the Input Signal area to the editing window.
- Customize layer size, position, and priority as needed.
For example:
- A 4K HDMI input can be split into smaller layers for dynamic presentations.
- Network inputs (IP cameras or NDI streams) can be grouped and displayed simultaneously.
4. Novastar H5 Advanced Features and Professional Control
The Novastar H5 Video Wall Controller offers a suite of professional-grade features tailored for demanding applications:
Multi-Screen Management
Manage up to three screens concurrently with independent resolutions and layouts. Use preset groups to synchronize transitions across displays.
Input Source Grouping
Organize input sources into logical groups for streamlined management. For instance:
- Group local video inputs separately from IP camera feeds.
- Assign custom names to each group for quick identification.
Preset Playlists
Create playlists of presets for automated playback:
- Save individual presets after configuring layers.
- Add presets to a playlist and set durations for each.
- Activate the playlist to run automatically without manual intervention.


Reverse Control
Control remote PCs directly from the Novastar H5 Video Wall Splicer interface:
- Enable reverse control for specific inputs.
- Access the desktop of the connected PC through the web interface.
- Perform tasks like file navigation or presentation control remotely.
Audio Integration
When equipped with the H_2xAudio input+output card, the H5 supports audio routing:
- Route audio from video inputs or dedicated audio connectors.
- Adjust volume levels and apply one-click mute functionality.
6.Where can Novastar H5 Video Wall Controller be used?
The versatility of the Novastar H5 Video Wall Splicer makes it suitable for various industries and applications:
| Industry/Application | Use Case |
|---|---|
| Broadcasting | Live event coverage, studio monitoring, and post-production review. |
| Public Safety | Command centers for traffic management, emergency response coordination, and surveillance systems. |
| Corporate Environments | Boardroom presentations, digital signage, and conference room video walls. |
| Entertainment | Stage backdrops, immersive XR environments, and live performances. |
| Education & Research | Lecture halls, training facilities, and research visualization labs. |

7.Why Choose Novastar H5 Video Wall Splicer?
Novastar H5 is engineered to be the central nervous system of your most critical visual displays. It goes beyond simple splicing to offer an ecosystem of reliability, clarity, and control, making it the intelligent choice for control rooms, broadcast studios, command centers, and immersive experiences.
Total Signal & Display Freedom
Novastar H5 Video Wall Splicer modular design accepts virtually any signal you have—from legacy analog to 8K IP video—and delivers it to any display technology, including fine-pitch LED. This future-proof adaptability turns complex integration into a simple card swap.
True Fidelity Visual Processing
H5 actively enhances your content with 10-bit color depth, HDR10/HLG dynamic range, and precision frame synchronization. The result? Images that are not only stunningly vivid but also perfectly stable and accurate across the entire video wall.
Control Complexity from Anywhere
The intuitive web interface provides centralized control for source management, layout presets, and system monitoring. Access it securely from any device on your network, enabling efficient collaboration and rapid response from anywhere.
The Hidden Advantages of Novastar H5
- Cost-Effective Scalability: Start with what you need and expand effortlessly. The modular architecture protects your investment.
- Simplified Maintenance: Hot-swappable cards and a clear web-based monitoring dashboard minimize system downtime and repair costs.
- A Platform for Innovation: Features like support for NDI, ST 2110, and advanced multi-layer compositing make the H5 ready for tomorrow’s production workflows today.
8.FAQs
9.Conclusion
By following this comprehensive guide, you’ll be able to harness the full potential of the Novastar H5 Video Wall Controller. From initial setup to advanced configurations, every step is designed to maximize efficiency and creativity. Explore its capabilities today and elevate your visual storytelling to new heights!