Related Posts


Why is their LED display vibrant and smooth, while yours has color distortion, lag, or even black screens?Don’t worry—the issue might not be the screen itself, but your LED video processor settings! After reading this article, you’ll fully understand everything about video wall processors:How to choose? How to install? What settings work best? Get all the answers in one go!
catalogue
- 1. Шта је ЛЕД видео процесор?
- 2. Како одабрати прави ЛЕД видео процесор
- 3. Припрема процесора видео зида пре употребе
- 4. Како инсталирати ЛЕД видео процесор
- 5. Како контролисати ЛЕД зидни процесор?
- 6. Подешавање Novastar VX1000: Водич за конфигурацију корак по корак
- 7. Уобичајени проблеми и решења са ЛЕД процесором
- 8.Честа питања
- КСНУМКС.Цонцлусион
1.What is LED video processor?

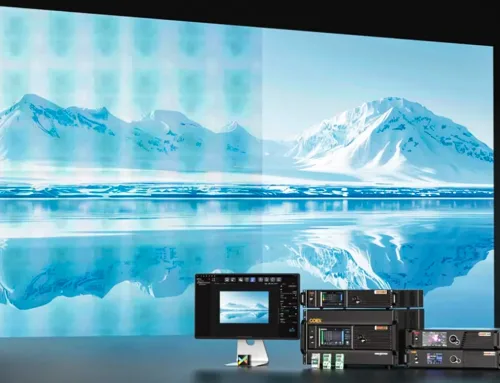
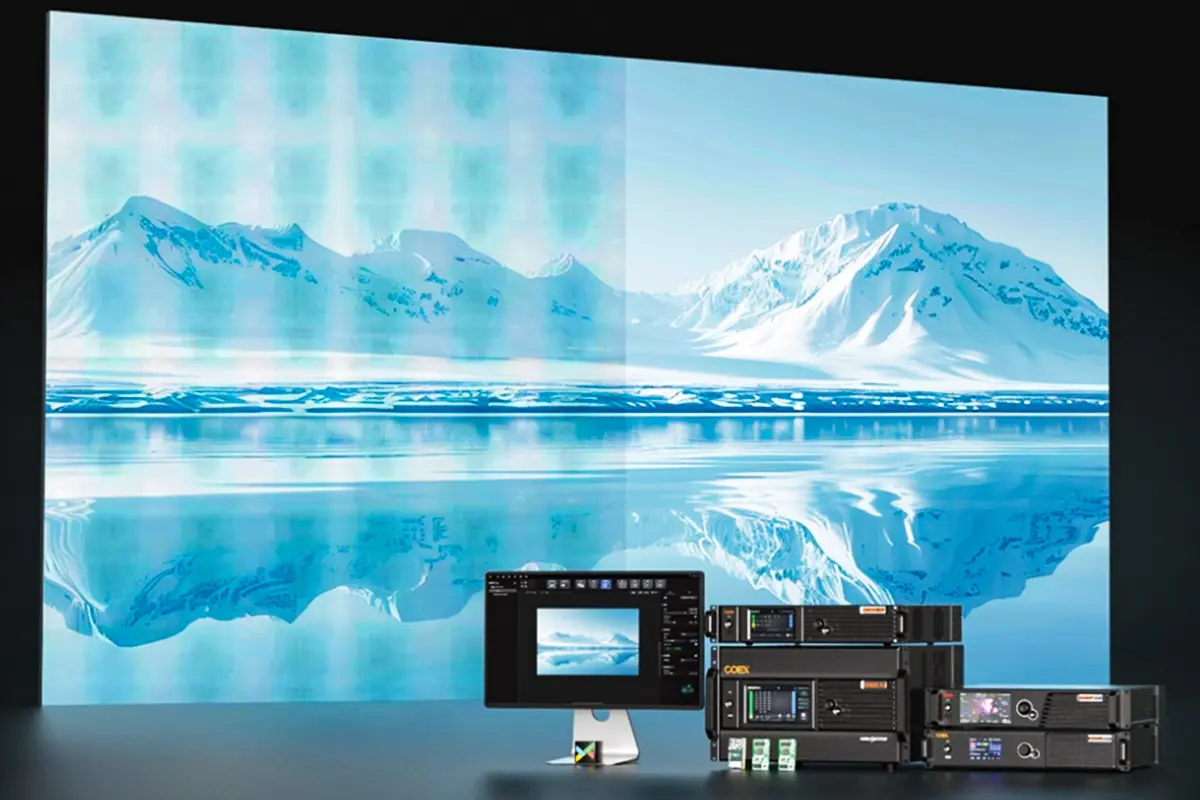
From the figure, we can see that the LED video processor plays the role of “brain” in the entire LED display system. It receives signals from cameras, computers, DVDs and other devices and optimizes them. These signals may be in multiple formats, such as HDMI, SDI, etc. After receiving the signal, the LED video processor converts the 1080p signal of the camera into a 3840×2160 point-to-point display of the LED screen, solves the color cast problem of the camera, and makes the LED screen display more realistic.
Finally, the LED video processor transmits the processed signal to the LED display through the Multifunction card in the figure. The Multifunction card is responsible for allocating signals and converting protocols, translating the signal from the video processor into a signal that the LED can “understand”, and then the LED screen displays it.
2.How to Choose the Right LED Video Processor
Selecting a suitable video wall processor involves considering multiple factors, including performance, features, compatibility, price, and usage scenarios. Below are detailed recommendations.
processor Core Performance
The processor’s core performance directly affects image quality and display effects, mainly including resolution support, refresh rate etc.
Resolution Compatibility
LED displays come in various resolutions—common ones like 1920×1080, 3840×2160, and custom sizes like 1280×384, 1024×768, or 1920×640. A good processor should support custom resolution scaling to fit the LED screen’s actual display area.
If the processor lacks this feature, the image may appear cropped or distorted.
Refresh Rate
LED screens typically require 1920Hz, 3840Hz, or higher refresh rates. The LED video processor must match this to avoid flickering, tearing, or moiré patterns, especially in live broadcasts or filming.
Refresh Rate Recommendations:
Commercial ads: ≥1920Hz
Stage shows/TV broadcasts: ≥3840Hz
Other Key Features
HDR support (for better contrast & colors)
Frame rate conversion (e.g., 24fps → 60fps)
Redundancy backup (for system stability)
Image Optimization Features
A quality processor should also offer:Scaling, color calibration, brightness adjustment Image enhancement, edge blending (for seamless multi-screen setups).
processor Budget Considerations
Processors range from a few hundred to thousands of dollars:
Entry-level ($300–800): Basic functions, single-screen support (e.g., small meeting rooms)
Mid-to-high ($800–2000): 4K, HDR, multi-screen, seamless switching (e.g., trade shows, live events)
Professional ($2000+): Redundancy, multi-device control, ultra-high refresh rates (e.g., concerts, control rooms)
video processor Usage Scenarios
Different applications have different needs:
Concerts/Stage Shows: Seamless switching, 4K, multi-screen sync
Meeting Rooms: Simple operation, stability, clear image
Control Rooms: Multi-channel management, long-term reliability
Digital Signage: Color accuracy, brightness, compatibility
LED processors Brand Comparison
Premium Choice: NovaStar (e.g., VX1000, VX600) – designed for LED displays.
Budget-Friendly: Colorlight & Linsn – great for commercial use, easy to operate.
3. Video wall processor preparation before use
Check the resolution range of the LED display
Confirm the resolution size supported by your LED display so that the output parameters of the processor can be set correctly. If the setting is wrong, problems such as incomplete display and disproportion may occur.
If you don’t know what the resolution of the LED display is, you can read this article: LED Resolution Guide>>
Prepare input signal equipment and cables
Common video processors support multiple signal interfaces such as HDMI, DVI, DP, SDI, etc. According to the actual application scenario, prepare input source devices (such as computers, players, cameras) and cables of corresponding interfaces in advance.
Install control software
Most LED video processors need to be set up through supporting software, such as:
NovaStar series needs to install NovaLCT or V-Can
Colorlight, Linsn, etc. also have their own control software.
Click this page to download related video wall processor software for free: LED Software>>
4.How to Install an LED Video Processor
For the LED video processor to work properly, you need to connect at least three types of cables:
Video Signal Cable
Connect your signal source (computer, media player, or camera) to the processor’s input port using an HDMI / DVI / DP / SDI cable.
Control System Connection
The processor’s output port must connect to the LED control system:
If the processor has a built-in sending card (e.g., NovaStar VX4S or VX1000), use a network cable or fiber optic cable to connect directly to the LED receiving card.
If there’s no built-in sending card, connect the processor to an external sending card first. The sending card then transmits the video signal to the LED receiving card to control the LED display.
Power Cable
Plug in the power cable, then turn on the processor, power supply, and display in order. The system will start running.
Note: If your video wall processor supports remote control and software configuration, download the control software from the manufacturer’s official website.

The above image shows the interface diagram of a Novastar VX1000 video processor. To ensure proper operation, you need to connect at least three types of cables:
Power Cable: Provides electricity to the entire device.
Input Cable (HDMI/DVI/SDI): Connects to video sources and provides content for the LED display.
Ethernet Cable (RJ45): Outputs processed video signals to the LED display’s receiving card. If the processor has a built-in receiving card, you can connect it directly to the LED screen.
5.How to Control an LED Wall Processor?
Manual Control (Buttons/Knobs)
Features: Adjust settings using buttons, knobs, or small-screen menus on the processor panel.
Best for: Simple stage performances, small meetings, or temporary exhibitions.
Advantages: No computer needed; quick on-site parameter adjustments.

Software Control (PC)
Features: Connect via USB, serial port, or Ethernet to configure settings using manufacturer-provided software.
Best for: Large events, command centers, or digital signage requiring complex setups.
Advantages: User-friendly interface, precise parameter tuning, and batch control.
Auto-Play Mode
Features: Connect via USB, serial port, or Ethernet to configure settings using manufacturer-provided software.
Best for: Large events, command centers, or digital signage requiring complex setups.
Advantages: User-friendly interface, precise parameter tuning, and batch control.
Example: Huidu HD-VP410S 3-in-1 LED Display Video Processor

Remote Network Control
Features: Access and control the processor remotely via LAN/internet.
Best for: Geographically dispersed LED screens (e.g., city billboards) or smart monitoring systems.
Advantages: Enables remote management/maintenance and cluster control.
Mobile APP Control
Features: Connect via Wi-Fi/Bluetooth and control the LED video processor using a smartphone app.
Best for: Temporary events, small displays, or conference setups.
Advantages: Convenient and beginner-friendly.
Current Trends
The most widely used control methods are manual buttons, PC software, and auto-play mode. With advancing technology, more LED processors now support remote network and mobile APP control, making operations smarter and more convenient.
6.Novastar VX1000 Setup: Step-by-Step Configuration Guide
Novastar vx1000 is recognized as an excellent video wall processor in the industry. It is suitable for scenes such as stages, exhibitions, and advertising walls. It has good image processing effects, more delicate and realistic displays, can connect to a variety of signal sources (such as computers, cameras, playback boxes, etc.), and is easy to use.

The following will explain the general operation of this video wall processor.
Novastar vx1000 video wall processor Output resolution setting
Example: LED display resolution: W2048dots x H512 dots
Step 1: Change the language to English before use. Rotate the knob to find “语言/Language” in the main menu, press the button to select “English”

Step 2: Set the width and height. Press the button to enter the “main layer”, set the “H Width” to “2048” and the “V Height” to 512. You can use the shortcut keys on the right to adjust the numbers.
Step 3: If you want to set other resolutions, do the same and change the width and height.

Use Novastar vx1000 processor to set up LED display screen into two windows
Example: Left LED display resolution: W1024dots x H512 dots, Right LED display resolution: W1024dots x H512 dots
Step 1: Set up the main layer window with a width of 1024 and a height of 512.
Step 2: Set the second window, select PIP1, “width” 1024, “height” 512, and set “initial X” to 1024.
Step 3: The two windows have the same signal source and display the same content

Step 4: To display different contents in two windows on the Novastar VX1000 controller, you need to connect two different signal sources.
- Signal source for main layer: HDMI
- Signal source for PIP1: DVI

Set the brightness of the LED display and calibrate the color
Enter the main menu: On the main interface, press the knob to enter the main menu.
Select input settings: Turn the knob, select “Input Settings”, and then press the knob to confirm.
Select input source: In the input settings interface, select the input source you want to adjust (such as HDMI, DVI, SDI), and press the knob to enter the setting interface of the input source.
Adjust color parameters: In the input source settings interface, select “Input Color”, and press the knob to enter the color settings interface.
Set specific parameters: In the color settings interface, you can adjust the following parameters:
Brightness: Adjust the brightness of the image, ranging from 0 to 100, and the default value is 50.
Contrast: Adjust the difference between light and dark areas in the image, ranging from 0 to 100, and the default value is 50.
Saturation: Adjust the purity and intensity of the color, ranging from 0 to 100, and the default value is 50.
Hue: Adjusts the color tendency of the image, ranging from -180 to +180, with a default value of 0.

If you prefer to use software for fine-tuning, you can connect the VX1000 controller via NovaLCT or V-Can software.
Below are the user manuals for these two software
To adjust brightness:
Open the software and go to the “Brightness” setting.
Modify the brightness level as needed.

7.Common LED Processor Problems & Solutions
Here are some common problems and solutions.
Problem 1: LED display screen has no signal output (black screen)
Possible reasons:
The input source resolution exceeds the range of LED video processor.
The cable is loose or the HDMI/DP protocol does not match.
Solution:
Forced to reduce the input resolution (such as setting it to 1080P through the computer).
Replace a standard optical fiber HDMI cable (marked to support 18Gbps bandwidth).

Problem 2: Video splicing is misaligned
Possible reasons:
The physical layout configuration of the processor and the LED panel does not match.
The synchronization signal is lost (when multiple processors are cascaded).
Solution:
Remap the cabinet arrangement in the LED processor software (with Novastar screenshots).
Check whether the Gigabit network cable is plugged in tightly (for network synchronization models).
Problem 3: Color deviation (such as reddish)
Possible reasons:
The color gamut of the processor and the LED panel does not match (such as sRGB vs. DCI-P3).
Color depth is lost during signal transmission.
Solution:
Load the preset ICC profile in the LED video processor.
Use 12G-SDI cables instead of HDMI (to avoid 8-bit color compression).
8.FAQs
9.Conclusion
The LED video processor is the core component of the LED display system, responsible for signal processing, image optimization and display control, which directly affects the smoothness, color performance and overall visual effect of the picture. Correct installation and use are essential to ensure the stable operation of the display.
After reading this article, if you have any questions about the video wall processor or need further support, please feel free to contact us, we will provide you with professional technical services.
